Nissan Altima (L32) 2007-2012 Service Manual: Condenser
Removal and Installation - Coupe
REMOVAL
1. Remove the rear seat cushion and the rear seatback.
Refer to SE-25, "Removal and Installation".
2. Remove the rear kicking plate, rear wheel well garnish and the rear pillar finisher.
Refer to INT-19, "Removal and Installation".
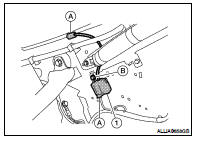
3. Disconnect the connectors (A), remove bolt (B), and then remove condenser (1) from the vehicle body.
INSTALLATION
Installation is in the reverse order of removal.
Removal and Installation - Sedan
REMOVAL
1. Remove the rear seat cushion and the rear seatback.
Refer to SE-53, "Removal and Installation".
2. Remove the rear kicking plate, rear wheel well garnish and the rear pillar finisher.
Refer to INT-36, "Removal and Installation".
3. Disconnect the electrical connector, remove bolt (A), and then remove condenser (1) from the vehicle body.
INSTALLATION
Installation is in the reverse order of removal.
 Filament
Inspection and Repair
INSPECTION
1. When measuring voltage, wrap tin foil around the top of the negative
probe. Then press the foil against the wire with your finger.
2. Attach probe circuit tes ...
 Horn
Horn
...
Other materials:
The oil pressure warning lamp does not turn on
Description
The oil pressure warning lamp stays off when the ignition switch is turned
ON.
Diagnosis Procedure
1.CHECK OIL PRESSURE WARNING LAMP
Perform IPDM E/R auto active test. Refer to PCS-14, "Diagnosis Description".
Is oil pressure warning lamp illuminated?
YES >> G ...
Front lower link
Removal and Installation
Removal
1. Remove the front lower link nut and bolt from the knuckle side
and the adjusting bolt and nut from the suspension member side
using power tools.
• Do not reuse the adjusting nut, use a new adjusting nut for
installation.
2. Remove the front lower link ...
Control device
Exploded View
1. Control lever knob
2. Lock pin
3. Knob cover
4. Control device selector plate
5. Control device assembly
Removal and Installation
REMOVAL
1. Remove the center console assembly. Refer to IP-18, "Disassembly and
Assembly".
2. Disconnect the control cable from ...
