Nissan Altima (L33) 2013-2018 Owners Manual: Tire pressure
Tire Pressure Monitoring System (TPMS)
This vehicle is equipped with the Tire Pressure Monitoring System (TPMS). It monitors tire pressure of all tires except the spare. When the low tire pressure warning light is lit and the “Tire Pressure Low - Add Air” warning appears in the vehicle information display, one or more of your tires is significantly under-inflated.
The TPMS will activate only when the vehicle is driven at speeds above 16 MPH (25 km/h). Also, this system may not detect a sudden drop in tire pressure (for example a flat tire while driving).
For more details, refer to “Low tire pressure warning light” in the “Instruments and controls” section, “Tire Pressure Monitoring System (TPMS)” in the “Starting and driving” section, and “Flat tire” in the “In case of emergency” section.
Tire inflation pressure
Check the tire pressures (including the spare) often and always prior to long distance trips. The recommended tire pressure specifications are shown on the F.M.V.S.S./C.M.V.S.S. certification label or the Tire and Loading Information label under the “Cold Tire Pressure” heading.
The Tire and Loading Information label is affixed to the driver side center pillar. Tire pressures should be checked regularly because:
● Most tires naturally lose air over time.
● Tires can lose air suddenly when driven over potholes or other objects or if the vehicle strikes a curb while parking.
The tire pressures should be checked when the tires are cold. The tires are considered COLD after the vehicle has been parked for 3 or more hours, or driven less than 1 mile (1.6 km) at moderate speeds.
The “TPMS with Easy Fill Tire Alert” provides visual and audible signals outside the vehicle for inflating tires to the recommended COLD tire pressure. For more information, see “TPMS with Easy Fill Tire Alert” in the “Starting and driving” section.
Incorrect tire pressure, including under inflation, may adversely affect tire life and vehicle handling.
WARNING
● Improperly inflated tires can fail suddenly and cause an accident.
● The Gross Vehicle Weight Rating (GVWR) is located on the F.M.V.S.S./C.M.V.S.S. certification label. The vehicle weight capacity is indicated on the Tire and Loading Information label. Do not load your vehicle beyond this capacity. Overloading your vehicle may result in reduced tire life, unsafe operating conditions due to premature tire failure, or unfavorable handling characteristics and could also lead to a serious accident. Loading beyond the specified capacity may also result in failure of other vehicle components.
● Before taking a long trip, or whenever you heavily load your vehicle, use a tire pressure gauge to ensure that the tire pressures are at the specified level.
● For additional information regarding tires, refer to “Important Tire Safety Information” (US) or “Tire Safety Information” (Canada) in the Warranty Information Booklet.
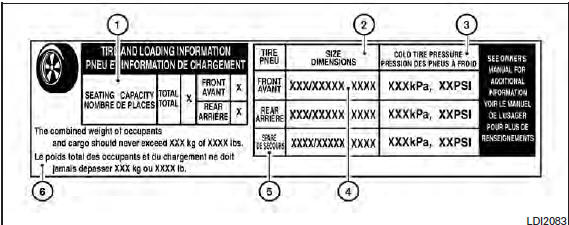
Tire and loading information label
1 Seating capacity: The maximum number of occupants that can be seated in the vehicle.
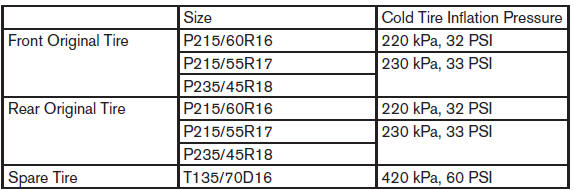
2 Original tire size: The size of the tires originally installed on the vehicle at the factory.
3 Cold tire pressure: Inflate the tires to this pressure when the tires are cold.
Tires are considered COLD after the vehicle has been parked for 3 or more hours, or driven less than 1 mile (1.6 km) at moderate speeds. The recommended cold tire inflation is set by the manufacturer to provide the best balance of tire wear, vehicle handling, driveability, tire noise, etc., up to the vehicle’s GVWR.
4 Tire size – refer to “Tire labeling” later in this section.
5 Spare tire size.
6 Vehicle load limit: See “Vehicle loading information” in the “Technical and consumer information” section.
Checking tire pressure
1. Remove the valve stem cap from the tire.
2. Press the pressure gauge squarely onto the valve stem. Do not press too hard or force the valve stem sideways, or air will escape. If the hissing sound of air escaping from the tire is heard while checking the pressure, reposition the gauge to eliminate this leakage.
3. Remove the gauge.
4. Read the tire pressure on the gauge stem and compare to the specification shown on the Tire and Loading Information label.
5. Add air to the tire as needed. If too much air is added, press the core of the valve stem briefly with the tip of the gauge stem to release pressure.
Recheck the pressure and add or release air as needed.
6. Install the valve stem cap.
7. Check the pressure of all other tires, including the spare.
 Wheels and tires
 Tire labeling