Nissan Altima (L32) 2007-2012 Service Manual: Rear view camera control unit
Diagnosis Procedure
1.CHECK FUSE
Check that the following fuses of the rear view camera control unit are not
blown.
Are the fuses OK?
YES >> GO TO 2
NO >> Be sure to eliminate cause of malfunction before installing new fuse.
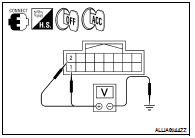
2.CHECK POWER SUPPLY CIRCUIT
Check voltage between rear view camera control unit harness connector
and ground.
Are the voltage readings as specified?
YES >> GO TO 3
NO >> Check harness between rear view camera control unit
and fuse.
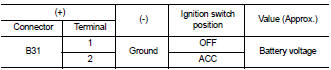
3.CHECK GROUND CIRCUIT
1. Turn ignition switch OFF.
2. Disconnect rear view camera control unit connector.
3. Check continuity between rear view camera control unit harness
connector B31 terminal 3 and ground.
Does continuity exist?
YES >> Inspection End.
NO >> Repair harness or connector.
Diagnosis Procedure
1.CHECK FUSE
Check that the following fuses of the AV control unit are not blown.
Are the fuses OK?
YES >> GO TO 2
NO >> Be sure to eliminate cause of malfuncti ...
Diagnosis Procedure
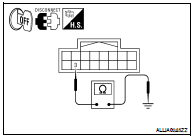
1.CHECK POWER SUPPLY CIRCUIT (REAR VIEW CAMERA SIDE)
Check voltage between rear view camera harness connector and
ground.
Is voltage reading approximately 6 volts?
YES &g ...
Other materials: Oil control system (if so equipped)
The oil control system can be accessed in
the Maintenance portion of the vehicle information
display settings.
Engine oil information informs the distance
to oil change. Never exceed one year or
7,500 miles (12000 km) between oil change
intervals for the 2.0L 4 cylinder (KR20DDET
engine model) or 1 ...
Rear-facing child restraint installation
using LATCH
For additional information, see all Warnings
and Cautions in the "Child safety"
and "Child restraints" before installing
a child restraint.
Do not use the lower anchors if the combined
weight of the child and the child restraint
exceeds 65 lbs. (29.5 kg). If the combined
weight of the child and the ...
Rear window and outside mirror
(if so equipped) defroster switch
To defrost the rear window glass and outside
mirrors (if so equipped), place the ignition
switch in the ON position and push the
rear window defroster switch on. The rear
window defroster indicator light on the
switch comes on. Push the switch again to
turn the defroster off.
The rear window defro ...


 AV control unit
 Rear view camera