Nissan Altima (L32) 2007-2012 Service Manual: Rear window defogger switch
Description
• The rear window defogger is operated by turning the rear window defogger
switch ON.
• Turns the indicator lamp in the rear window defogger switch ON when operating
the rear window defogger.
Component Function Check
1. CHECK REAR WINDOW DEFOGGER SWITCH FUNCTION
Check that the indicator lamp of rear window defogger illuminates with rear
window defogger switch ON.
Is the inspection result normal?
YES >> Rear window defogger switch function is OK.
NO >> Refer to DEF-10, "Diagnosis Procedure".
Diagnosis Procedure
1. CHECK FRONT AIR CONTROL (REAR WINDOW DEFOGGER SWITCH)
Does front air control operate normally?
Is the inspection result normal?
YES >> Inspection End.
NO >> GO TO 2
2. CHECK REAR WINDOW DEFOGGER SWITCH INDICATOR CIRCUIT
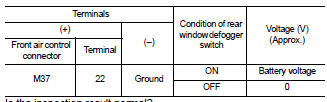
1. Turn ignition switch ON.
2. Check voltage between front air control connector and ground.
Is the inspection result normal?
YES >> Replace front air control. Refer to VTL-8, "Removal and Installation".
NO >> Repair or replace harness.
Description
Power is supplied to the rear window defogger with BCM control.
Component Function Check
1. CHECK REAR WINDOW DEFOGGER RELAY POWER SUPPLY CIRCUIT
Check that an operation noise of rear ...
Other materials: Rear-facing child restraint installation
using LATCH
For additional information, see all Warnings
and Cautions in the "Child safety"
and "Child restraints" before installing
a child restraint.
Do not use the lower anchors if the combined
weight of the child and the child restraint
exceeds 65 lbs. (29.5 kg). If the combined
weight of the child and the ...
Seat belt extenders
If, because of body size or driving position, it
is not possible to properly fit the lap/
shoulder belt and fasten it, an extender
that is compatible with the installed seat
belts is available for purchase. The extender
adds approximately 8 in (200 mm)
of length and may be used for either the
driver ...
Seat belt warning light and chime
The driver and front passenger seat is
equipped with an enhanced seat belt reminder
function.
A visual and audible alert will operate at
speeds of approximately 9 mph (15 km/h)
or more under the following conditions:
If the driver seat belt is not fastened.
The front passenger’s seat belt is ...
 Component diagnosis
 Rear window defogger relay