Nissan Altima (L32) 2007-2012 Service Manual: Clutch pedal
Inspection and Adjustment
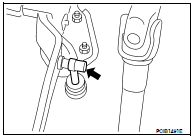
1. Check to see if the master cylinder rod end moves freely. It should not be bound by the clutch pedal.
• If the rod end does not move freely, remove the rod end and check for deformation or damage on the rod end. Leave the rod end removed for step 2.
2. Check the clutch pedal stroke for free range of movement.
a. With the master cylinder rod end removed, manually move the clutch pedal up and down to determine if it moves freely.
b. If any sticking is noted, replace the clutch pedal assembly.
Reverify that the master cylinder rod end moves freely.
3. Inspect the ASCD switch position.
a. If the rod end does not move freely, check that the ASCD switch is not applying pressure to the clutch pedal causing the rod end to bind. To adjust, disconnect the ASCD switch electrical connector and turn the ASCD switch.
b. Connect the ASCD switch electrical connector.
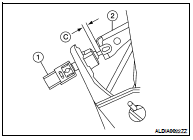
4. Adjust clutch interlock switch (1) position so that clearance between clutch pedal (2) and thread end of clutch interlock switch (1), with clutch pedal fully depressed, is within specification (C).

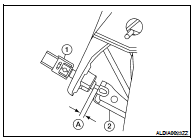
5. Adjust ASCD clutch switch (1) position so that clearance between clutch pedal (2) and thread end of ASCD clutch switch (1), with clutch pedal fully released, is within specification (A).

6. Check the clutch hydraulic system components (clutch master cylinder, CSC) for sticking or binding.
a. If any sticking or binding is noted, repair or replace the related parts as necessary.
b. If any hydraulic system repair was necessary, bleed the clutch hydraulic system. Refer to CL-7, "Air Bleeding Procedure".
NOTE: Do not use a vacuum assist or any other type of power bleeder on this system. Use of a vacuum assist or power bleeder will not purge all of the air from the system.
 On-vehicle maintenance
 Clutch fluid