Nissan Altima (L32) 2007-2012 Service Manual: Clutch piping
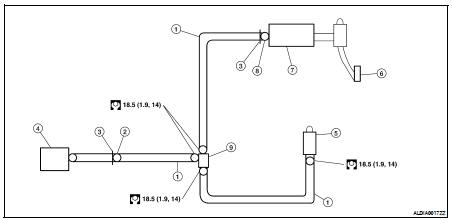
Exploded View
1. Clutch tube
2. CSC connector
3. Lock pin
4. CSC
5. Air bleed connector valve
6. Clutch pedal
7. Clutch master cylinder
8. Clutch master cylinder connector
9. Branch connector
Removal and Installation
CAUTION:
Do not spill clutch fluid onto painted surfaces. If it spills, wipe up
immediately and wash the affected
area with water.
REMOVAL
1. Remove the air cleaner and air duct. Refer to EM-19, "Removal and
Installation" for QR25DE and EM-
123, "Removal and Installation" for VQ35DE.
2. Remove the lock pin and disconnect the clutch master cylinder connector.
3. Remove the clutch tubes from the branch connector.
4. Remove the clutch tube and air bleed connector valve.
5. Remove the branch connector.
6. Remove lock pin and disconnect the CSC connector.
INSTALLATION
Installation is in the reverse order of removal.
• Make sure that all tubes are fully installed into connectors.
• Make sure that all connector lock pins are fully installed.
• After installation, bleed clutch hydraulic system. Refer to CL-7, "Air
Bleeding Procedure".
Removal and Installation
REMOVAL
1. Remove the air cleaner and air duct. Refer to EM-19, "Removal and
Installation" for QR25DE and EM-
123, "Removal and Installation" for VQ35 ...
Other materials: Passenger compartment
Power moonroof (if so equipped)
Sun visors
Interior lights
HomeLink Universal Transceiver (if so
equipped)
Rearview mirror
Glove box
Cup holders
Console box
Rear armrest
Cup holders
Refer to the page number indicated in
parentheses for operating details.
Instrument panel
Vents
...
Warning/Indicator lights (other)
For additional information on warnings
and indicators, see "Vehicle information
display-5 inch (13 cm) Type A" or
"Vehicle information display 7 inch (18 cm)
Type B".
Automatic brake hold
indicator light (white/green)
(if so equipped)
The automatic brake hold indicator light
(white) illuminates whe ...
Vehicle information display - 7 inch (18 cm) Type B (if so equipped)
The vehicle information display is located
to the left of the speedometer. It displays
such items as:
Vehicle settings
Indicators and warnings
Information/warning messages
Tire pressure information
Drive computer information
Cruise control system information
Driving Aids (if so equipped)
P ...
 Clutch master cylinder
 Removal and installation