Nissan Altima (L32) 2007-2012 Service Manual: Front coil spring and strut
Removal and Installation
REMOVAL
1. Remove wheel and tire. Refer to WT-66, "Adjustment".
2. Remove brake caliper and reposition aside using wire. Refer to BR-30, "BRAKE CALIPER ASSEMBLY : Exploded View".
CAUTION: Avoid depressing brake pedal with brake caliper removed.
3. Remove wheel sensor electrical harness from strut. Refer to BRC-63, "Removal and Installation" (ABS), BRC-134, "Removal and Installation" (TCS/ABS), BRC-236, "Removal and Installation" (VDC/TCS/ABS).
4. Remove brake hose lock plate.
5. Remove steering knuckle to strut bolts and nuts. Refer to FSU-12, "Exploded View".
6. Remove bolt on strut tower bar then bolts on strut tower and remove strut from vehicle.
INSPECTION AFTER REMOVAL
Check the strut for any oil leakage or other damage and replace as necessary.Ball Joint Inspection
CAUTION: Before measurement, move the ball joint at least ten times by hand to check for smooth movement.
INSTALLATION
Installation is in the reverse order of removal.
• Refer to FSU-12, "Exploded View" for tightening torque.
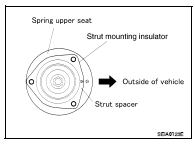
• Be sure arrows on strut mount insulator and spring upper seat are positioned as shown. Also be sure notch in strut spacer is positioned as shown. Then install strut.
• Assemble upper mounting plate with its notch facing toward the outside.
 On-vehicle repair
 Transverse link