Nissan Altima (L32) 2007-2012 Service Manual: Headlamp
Bulb Replacement
HEADLAMP
CAUTION: • Do not touch the glass of bulb directly by hand. Keep grease and other oily substances away from bulb. Do not touch bulb by hand while it is lit or right after being turned off, burning may result.
Removal
1. Disconnect negative battery terminal.
2. Position the fender protector aside. Refer to EXT-19, "Removal and Installation" 3. Turn the headlamp bulb sockets counterclockwise to unlock and remove them (halogen).
4. Remove the plastic cover, disconnect the ignitor, unlock the retaining spring to unlock and remove the bulb (xenon only).
5. Turn the high beam lamp bulb socket counterclockwise to unlock and remove it.
Installation
CAUTION: After installing the bulb, be sure to install the plastic cap securely to ensure watertightness.
Installation is in the reverse order of removal.
FRONT TURN SIGNAL LAMP
Removal
1. Turn the bulb socket counterclockwise to unlock it.
2. Pull the bulb to remove it.
Installation
Installation is in the reverse order of removal.
CAUTION: After installing a headlamp bulb, be sure to install the bulb socket securely to ensure watertightness.
Removal and Installation
COMBINATION LAMP
Removal
1. Disconnect battery negative terminal.
2. Remove the front bumper fascia. Refer to EXT-13, "Removal and Installation".
3. Ensure lighting switch is OFF.
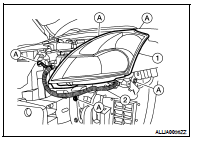
4. Remove the headlamp bolts (A).
5. Pull the headlamp assembly (1) toward the front of the vehicle, detach the headlamp harness (2) from the headlamp assembly, disconnect the bulb connectors and remove.

Installation
Installation is in the reverse order of removal.
NOTE: Confirm headlamp aiming adjustment. Refer to EXL-248, "Aiming Adjustment".
Disassembly and Assembly
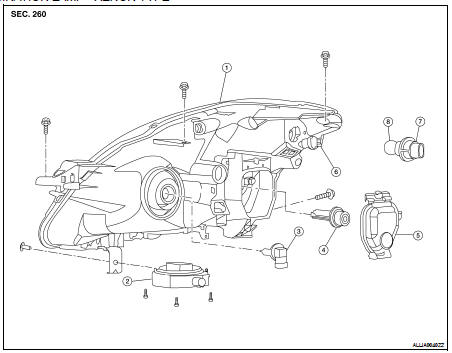
COMBINATION LAMP - XENON TYPE

1. Headlamp assembly
2. Ballast
3. Halogen bulb (high beam)
4. Xenon bulb
5. Plastic cover
6. Park/side marker lamp bulb
7. Front turn signal lamp bulb socket
8. Front turn signal lamp bulb
Disassembly
CAUTION: • Do not touch the glass of the bulb directly by hand. Keep grease and other oily substances away from bulb. Do not touch bulb while it is lit or right after being turned off, burning may result. 1. Remove the plastic cover, disconnect the xenon bulb connector, unlock the retaining spring to remove the xenon bulb.
2. Turn the halogen bulb (high beam) lamp socket counterclockwise to unlock and remove it.
3. Turn the front turn signal lamp bulb socket counterclockwise to unlock and remove it.
4. Pull the front turn signal lamp bulb from its socket.
5. Turn the park/side marker lamp bulb socket counterclockwise to unlock and remove it.
6. Pull the park/side marker lamp bulb from its socket.
Assembly
Assembly is in the reverse order of disassembly.
CAUTION: • After installing the xenon bulb, be sure to install plastic cover securely to ensure watertightness.
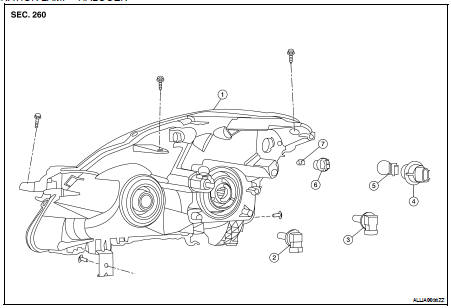
COMBINATION LAMP - HALOGEN

1. Headlamp assembly
2. Halogen lamp bulb (high beam)
3. Halogen lamp bulb (low beam)
4. Front turn signal lamp bulb socket
5. Front turn signal lamp bulb
6. Park/side marker lamp bulb socket
7. Park/side marker lamp bulb
Disassembly
CAUTION: • Do not touch the glass of the bulb directly by hand. Keep grease and other oily substances away from bulb. Do not touch bulb while it is lit or right after being turned off, burning may result. 1. Turn the halogen lamp bulb (low beam) counterclockwise to unlock and remove it.
2. Turn the halogen lamp bulb (high beam) socket counterclockwise to unlock and remove it.
3. Turn the front turn signal lamp bulb socket counterclockwise to unlock and remove it.
4. Pull the front turn signal lamp bulb from its socket.
5. Turn the park/side marker lamp bulb socket counterclockwise to unlock and remove it.
6. Pull the park/side marker lamp bulb from its socket.
Assembly
Assembly is in the reverse order of disassembly.

 On-vehicle repair
 Front fog lamp