Nissan Altima (L32) 2007-2012 Service Manual: Removal and installation
FRONT SUSPENSION ASSEMBLY
Exploded View
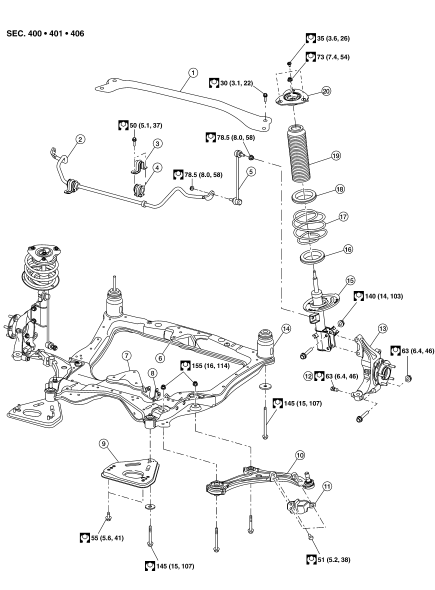
1. Strut tower bar
2. Stabilizer bar
3. Stabilizer clamp
4. Stabilizer bushing
5. Connecting rod
6. VQ35DE front mount bracket
7. VQ35DE rear mount bracket
8. QR25DE mount bracket
9. Member pin stay
10. Transverse link
11. Steering stop plate
12. Steering stop
13. Steering knuckle
14. Front suspension member
15. Strut
16. Lower rubber seat
17. Coil spring
18. Upper rubber seat
19. Dust cover
20. Strut mount insulator
Removal and Installation
REMOVAL
QR25DE Engine and VQ35DE Engine with M/T
1. Remove wheel and tire. Refer to WT-66, "Adjustment".
2. Remove engine under cover. Refer to EXT-13, "Removal and Installation" (Coupe), EXT-34, "Removal and Installation" (Sedan).
3. Remove nut on lower portion of stabilizer connecting rod from transverse link.
4. Remove transverse link from suspension member, and move the transverse link outward.
5. Remove front exhaust tube. Refer to EX-6, "Removal and Installation" (QR25DE), EX-12, "Removal and Installation" (VQ35DE).
6. Support engine or transmission with a jack.
7. Remove steering gear bolts. Remove steering gear and power steering tube bracket from suspension member.
8. Hang steering gear.
9. Remove front and rear engine mount insulator bolts from suspension member.
10. Remove body-side bolts from member pin stay.
11. Set a jack under suspension member, and remove suspension member nuts.
12. Slowly lower jack to remove suspension member from vehicle.
VQ35DE Engine with CVT
Engine, transmission and suspension member must be removed as an assembly. Refer to EM-202, "Removal and Installation".
Once removed as an assembly, lift engine and transmission off of suspension member.
INSTALLATION
Installation is in the reverse order of removal.
• Refer to FSU-12, "Exploded View" for tightening torque.
• After installation, perform final tightening of each part under unladen conditions with tires on ground. Check wheel alignment. Refer to FSU-7, "Inspection and Adjustment".
 Front stabilizer
 Disassembly and assembly