Nissan Altima (L33) 2013-2018 Owners Manual: Settings
The setting mode allows you to change the information
displayed in the vehicle information display:
● Driver Assistance (if so equipped)
● Main Menu Selection
● Body Color
● Maintenance
● Alarms
● Vehicle Settings
● Language
● Unit
● Welcome Effects
● Factory Reset
Driver Assistance (if so equipped)
To change the status, warnings or turn on or off
any of the systems/warnings displayed in the
“Driver Assistance” menu:
Use the  button to select and the
ENTER
button to change a menu item:
● Driving Aids (if so equipped)
● Parking Aids (if so equipped)
Driving Aids (if so equipped)
To change the status, warnings or turn on or off any of the systems/warnings displayed in the “Driving Aids” menu.
Use the button to select and the
ENTER
button to change a menu item:
● Lane
● Blind Spot
Parking Aids (if so equipped)
To turn on or off the system displayed in the “Parking Aids” menu use the button to select and the ENTER button to enable/disable “Moving Object”.
For additional information, see “Moving Object Detection (MOD)” in the “Monitor, climate, audio, phone and voice recognition systems” section.
Main Menu Selection The items that display can be enabled/disabled when the ignition switch is placed in the ON position. To change the items that display.
Use the button to select and the
ENTER
button to change a menu item:
● Trip Computer
● Audio
● Navigation (if so equipped)
● Fuel Economy
● Tire Pressures (if so equipped)
Trip Computer
The trip computer can be enabled/disabled to display in the vehicle information display when the ignition switch is placed in the ON position.
From the “Main Menu Selection” select “Trip Computer” to display in the vehicle information display when the ignition is placed in the ON position.
Audio
The audio can be enabled/disabled to display in the vehicle information display when the ignition switch is placed in the ON position to display the radio information in the vehicle information display.
From the “Main Menu Selection” select “Audio” to display in the vehicle information display when the ignition is placed in the ON position.
Navigation (if so equipped)
The navigation can be enabled/disabled to display in the vehicle information display when the ignition switch is placed in the ON position.
From the “Main Menu Selection” select “Navigation” to display in the vehicle information display when turn-by-turn is used and the ignition is placed in the ON position.
Fuel Economy
The fuel economy can be enabled/disabled to display in the vehicle information display when the ignition switch is placed in the ON position.
From the “Main Menu Selection” select “Fuel Economy” to display in the vehicle information display when the ignition is placed in the ON position.
Tire Pressures (if so equipped)
The tire pressures can be enabled/disabled to display in the vehicle information display when the ignition switch is placed in the ON position.
From the “Main Menu Selection” select “Tire Pressures” to display in the vehicle information display when the ignition is placed in the ON position.
Body Color
The color of the vehicle that displays in the vehicle information display when the ignition switch is placed in the ON position can be changed.
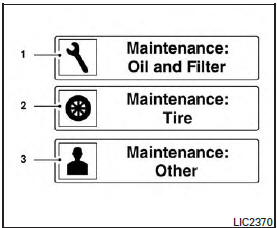
1. scheduled service: oil and oil filter
2. tires
3. other
Maintenance
The maintenance mode allows you to set alerts
for the reminding of maintenance intervals. To
change an item:
1. Press the  button.
2. Use the  button until “Settings”
is selected,
and press ENTER.
3. Select “Maintenance” using the 
button
and press ENTER.
Service
This indicator appears when the customer set distance comes for changing the engine oil and filter. You can set or reset the distance for checking or replacing these items. For scheduled maintenance items and intervals, see your “NISSAN Service and Maintenance Guide.”
Tire
This indicator appears when the customer set distance is reached for replacing tires. You can set or reset the distance for replacing tires.
WARNING
The tire replacement indicator is not a substitute for regular tire checks, including tire pressure checks. See “Changing Wheels and Tires” in “Maintenance & Do- It-Yourself” section. Many factors including tire inflation, alignment, driving habits and road conditions affect tire wear and when tires should be replaced. Setting the tire replacement indicator for a certain driving distance does not mean your tires will last that long. Use the tire replacement indicator as a guide only and always perform regular tire checks. Failure to perform regular tire checks, including tire pressure checks could result in tire failure.
Serious vehicle damage could occur and may lead to a collision, which could result in serious personal injury or death.
Other
This indicator appears when the customer set distance is reached for checking or replacing maintenance items other than the engine oil, oil filter and tires. Other maintenance items can include such things as air filter or tire rotation. The distance for checking or replacing the items can be set or reset.
Alarms
This setting allows the customer to set alarms for outside temperature and a timer alert.
1. Press the button.
2. Use the button until “Settings”
is selected,
and press ENTER.
3. Select “Alarms” using the
button and
press ENTER.
Outside Temperature
This setting allows the customer to enable/disable the alert for low outside temperature in the vehicle information display.
1. Use the button to select
“Outside
Temperature”.
2. Press the ENTER button to turn ON/OFF the outside temperature in the vehicle information display.
Timer Alert
This setting allows the driver to set an alert to notify a set time has been reached.
1. Use the button to select “Timer
Alert”.
2. Press the ENTER button.
3. To change the timer amount, use the
button and the ENTER button to save the
selected time amount.
Navigation (if so equipped)
This setting allows the customer to enable/disable the alert for navigation in the vehicle information display.
1. Use the buttons to select
“Navigation”.
2. Press the ENTER button to turn ON/OFF the alert.
Vehicle Settings
The vehicle settings allows the customer to change settings for interior lights, intelligent key settings, unlock settings and other vehicle settings.
The vehicle settings can be changed using
the ,
, and the ENTER buttons.
Auto Room Lamp
The interior lights can be set to be ON or OFF if any door is unlocked. From the Vehicle Settings menu, select “Auto Room Light”. Use the ENTER button to turn this feature ON or OFF.
Light Sensitivity (if so equipped)
The light sensitivity can be set to illuminate earlier based on the brightness outside the vehicle.
From the Vehicle Settings menu, select “Light Sensitivity”. Use the ENTER button to change the sensitivity.
Light Off Delay (if so equipped)
The duration of the automatic headlights can be changed from 0 to 180 seconds. From the Vehicle Settings menu, select “Light Off Delay”. Use the ENTER button to change the duration.
Wiper with Speed
The wiper with speed can be set to be ON or OFF. From the Vehicle Settings menu, select “Wiper with Speed”. Use the ENTER button to turn this feature ON or OFF.
I-Key Door Lock (if so equipped)
From the Vehicle Settings menu, select “I-Key Door Lock”. When this item is turned on, the request switch on the door is activated. When this item is turned off, the request switch on the door is deactivated. Use the ENTER button to activate this function.
Selective-Unlock
When this item is turned on, only the driver’s door is unlocked first after the door unlock operation. When the door handle request switch on the driver’s or front passenger’s side door is pushed to be unlocked, only the corresponding door is unlocked first. All the doors can be unlocked if the door unlock operation is performed again within 1 minute. When this item is turned to off, all the doors will be unlocked after the door unlock operation is performed once. From the Vehicle Settings menu, select “Selective Unlock”. Use the ENTER button to activate this function.
Auto Door Unlock
The auto door unlock function automatically unlocks all the doors when the shift lever is placed in the P (Park) position. From the Vehicle Settings menu, select “Auto Door Unlock”. Use the ENTER button to enable/disable this function.
Answer back horn
When the answer back horn is on, the horn will chirp and the hazard indicators will flash once when locking the vehicle with the Intelligent Key.
Remote Start (if so equipped) The remote start function can be turned on or off.
If the setting is OFF the vehicle cannot be started using the Intelligent Key. From the Vehicle Settings menu, select “Remote Start”. Use the ENTER button to enable/disable.
Battery Saver
The battery saver automatically turns off the ignition after a period of time when the ignition switch is left in the ACC or ON position.
Language
The language of the vehicle information display
can be changed to:
● US English
● French
● Spanish
Use the ,
, and the ENTER buttons to
select and change the language of the vehicle
information display. The language of the center
display/navigation can be changed independently
of the vehicle information display. For vehicles
not equipped with Navigation see “SETTING
button:” and vehicles equipped with
Navigation see, “System” in the “Monitor, climate,
audio, phone and voice recognition systems”
section of this manual.
Units
The units that are shown in the vehicle information
display can be changed:
● Mileage
● Tire pressures
● Temperature
Use the ,
, and the ENTER buttons to
select and change the units of the vehicle information
display. The units of the navigation screen
can be changed independently of the vehicle
information display. For vehicles equipped with
Navigation, see “System” in the “Monitor, climate,
audio, phone and voice recognition systems”
section of this manual.
Mileage
The unit for the mileage that displays in the vehicle information display can be changed to: ● miles, MPG, inch ● km/h, l/100km, cm ● km/h, km/l, cm
Use the and the ENTER buttons to
select
and change the unit.
Tire Pressures (if so equipped)
The unit for tire pressure that displays in the
vehicle information display can be changed to:
● psi
● kPa
● bar
● Kgf/cm2
Use the and the ENTER buttons to
select
and change the unit.
Temperature
The temperature that displays in the vehicle information
display can be changed from:
● °F (Fahrenheit)
● °C (Celsius)
Use the ENTER button to toggle choices.
Welcome Effects
The welcome screen display can be turned
ON/OFF to display when the ignition switch is
placed in the ACC or ON position. To
enable/disable the welcome screen:
1. Press the  button.
2. Use the buttons to select
“Settings”,
and press ENTER.
3. Select “Welcome Effects” using the
buttons and press ENTER to turn this function
ON or OFF.
Factory Reset
The settings in the vehicle information display can
be reset back to the factory default. To reset the
vehicle information display:
1. Press the  button.
2. Use the buttons to select
“Settings”,
and press the ENTER button.
3. Select “Factory Reset” using the
buttons
and press the ENTER button.
4. Select “YES” to return all settings back to default by pressing the ENTER button.
 Startup display
 Vehicle information display warnings and indicators