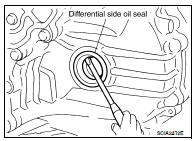
Nissan Altima (L32) 2007-2012 Service Manual: Differential side oil seal
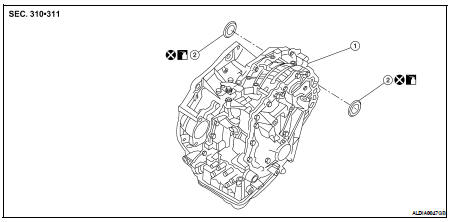
Exploded View
1. CVT assembly
2. Differential side oil seal
Removal and Installation
REMOVAL
1. Remove drive shaft assembly. Refer to FAX-11, "Removal and
Installation (Left Side)" and FAX-12, "Removal and Installation
(Right Side)".
2. Remove the differential side oil seal using suitable tool
CAUTION:
Do not scratch transaxle case or converter housing.
INSTALLATION
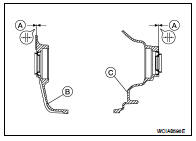
1. Drive the new differential side oil seal into the transaxle case
side (B) and converter housing side (C) until it is flush using
Tool.
Tool number : KV38100300 ( — )
Dimension A : 1.8 ± 0.5 mm (0.071 ± 0.020 in)
CAUTION:
• Do not reuse differential side oil seals.
• Apply specified NISSAN CVT fluid to side oil seals.
2. Install drive shaft assembly. Refer to FAX-11, "Removal and
Installation (Left Side)" and FAX-12, "Removal and Installation (Right Side)".
3. Check CVT fluid level. Refer to TM-416, "Inspection".
Exploded View
1. Control lever
2. Control device assembly
3. Control cable socket
4. Retainer grommet
5. Control cable
6. Bracket
7. Lock plate
8. Manual lever
Removal and Installation
RE ...
Exploded View
1. Air breather hose
2. Clip
3. Bracket
4. Air breather tube
5. CVT assembly
A. Paint mark
Removal and Installation
Refer to the figure for removal and installation.
CAUTIO ...
Other materials: Air bags, seat belts and child restraints
Top tether strap anchor
Rear seat belts with pretensioner(s) for
outboard seating
Roof-mounted curtain side-impact and
rollover supplemental air bag
Front seat-mounted side-impact
supplemental air bag
Head restraints/headrests
Front seat belt with pretensioner(s) and
shoulder height adju ...
Warning/Indicator lights (red)
For additional information on warnings
and indicators, see "Vehicle information
display - 5 inch (13 cm) Type A" or
"Vehicle information display - 7 inch (18cm)
Type B".
or
Brake warning
light
This light functions for both the parking
brake and the foot brake systems.
Parking brake indicator (if s ...
Supplemental air bag warning labels
Warning labels about the supplemental
front-impact air bag system are placed in
the vehicle as shown in the illustration.
WARNING
Do not use a rear-facing child restraint
on a seat protected by an air bag in
front of it. If the air bag deploys, it may
cause serious injury or death.
Supplemental air ...

 Control cable
 Air breather hose