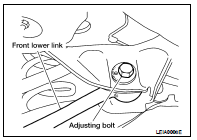
Nissan Altima (L32) 2007-2012 Service Manual: Front lower link
Removal and Installation
Removal
1. Remove the front lower link nut and bolt from the knuckle side
and the adjusting bolt and nut from the suspension member side
using power tools.
• Do not reuse the adjusting nut, use a new adjusting nut for
installation.
2. Remove the front lower link.
Installation
Installation is in the reverse order of removal.
• Do not reuse the adjusting nut, use a new adjusting nut for installation.
• Check the rear wheel alignment and adjust if necessary. Refer to RSU-18, "Rear
Wheel Alignment
(Unladen*)".
Removal and Installation
Removal
1. Loosen the rear lower link bolt and nut from the suspension member side.
2. Support the rear lower link by placing a suitable jack under the knuckle.
3. Rem ...
Removal and Installation
Removal
1. Remove the rear suspension assembly. Refer to RSU-12, "Removal and
Installation".
2. Remove the radius rod using power tools.
Installation
Insta ...
Other materials: Fuel gauge
The gauge indicates the approximate fuel
level in the tank.
The gauge may move slightly during braking,
turning, acceleration, or going up or
down hills.
The gauge needle returns to 0 (Empty) after
the ignition switch is placed in the OFF
position.
The low fuel warning message shows in
the vehic ...
Trip computer
1. Home
This display indicates the home screen.
2. Vehicle speed
The vehicle speed mode shows the current
vehicle speed and the average vehicle
speed since the last reset.
Average vehicle speed:
Press and hold the OK button on the steering
wheel to bring up the drive computer Reset
menu, and follow ...
Supplemental air bag warning labels
Warning labels about the supplemental
front-impact air bag system are placed in
the vehicle as shown in the illustration.
WARNING
Do not use a rear-facing child restraint
on a seat protected by an air bag in
front of it. If the air bag deploys, it may
cause serious injury or death.
Supplemental air ...
 Rear lower link & coil spring
 Radius rod