Nissan Altima (L32) 2007-2012 Service Manual: Rear bumper
Removal and Installation
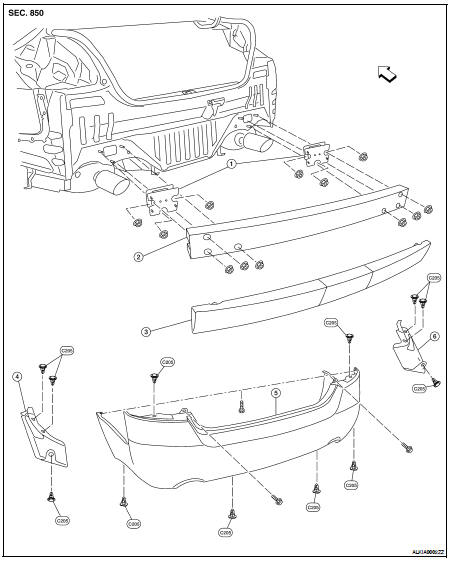
1. Rear bumper supports
2. Rear bumper reinforcement
3. Energy absorbing foam
4. Splash shield LH
5. Rear bumper fascia
6. Splash shield RH
REMOVAL
1. Remove the LH and RH rear combination lamps. Refer to EXL-260, "Removal
and Installation".
2. Remove both the rear wheels and tires. Refer to WT-66, "Adjustment".
3. Remove the LH and RH splash shields.
4. Remove the rear bumper fascia clips and screws, then remove the rear bumper
fascia.
5. Remove the rear energy absorbing foam.
6. Remove the rear bumper reinforcement.
7. Remove the rear bumper supports.
INSTALLATION
Installation is in the reverse order of removal.
Removal and Installation
1. Front bumper supports
2. Front bumper reinforcement
3. Energy absorbing foam
4. Tow cover
5. Front grille
6. Engine under cover
7. Fog lamp finisher (if equipped)
...
Removal and Installation
1. Front grille
2. Bumper fascia
FRONT GRILLE
Removal
1. Remove the front grille clips.
2. Release the grille tabs from the front bumper fascia, then remove the ...
Other materials: Rear-facing child restraint installation
using the seat belts
WARNING
The three-point seat belt with Automatic
Locking Retractor (ALR) must be
used when installing a child restraint.
Failure to use the ALR mode will result
in the child restraint not being properly
secured. The restraint could tip over or
be loose and cause injury to a child in a
sudden stop o ...
Forward-facing child restraint
installation using LATCH
For additional information, see all Warnings
and Cautions in "Child safety" and
"Child restraints" before installing a
child restraint.
Do not use the lower anchors if the combined
weight of the child and the child restraint
exceeds 65 lbs. (29.5 kg). If the combined
weight of the child and the chi ...
USB/iPod charging ports (if so equipped)
Front (Type A) (if so equipped)
Front (Type B) (if so equipped)
Front (Type C) (if so equipped)
Rear (if so equipped)
Type-C USB
Type-A USB
There are USB charging ports located in
the rear seat area on the back of the center
console. These ports will charge compatible
devices.
NOTE:
Not al ...

 Front bumper
 Front grille