Nissan Altima (L32) 2007-2012 Service Manual: Bose speaker AMP
Removal and Installation - Coupe
REMOVAL
1. Disconnect the negative battery terminal.
2. Remove the trunk floor carpet and spare tire cover. Refer to INT-23, "Removal
and Installation".
3. Remove the RH trunk floor spacer.
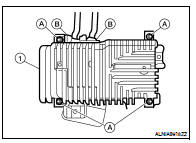
4. Remove the Bose speaker amp. screws (A), then disconnect the
Bose speaker amp. connectors (B) and remove the Bose
speaker amp. (1).
INSTALLATION
Installation is in the reverse order of removal.
Removal and Installation - Sedan
REMOVAL
1. Disconnect the negative battery terminal.
2. Open the trunk lid.
3. Remove the Bose speaker amp. screws (A), then disconnect the
Bose speaker amp. connectors (B) and remove the Bose
speaker amp. (1).
INSTALLATION
Installation is in the reverse order of removal.
Removal and Installation
REMOVAL
1. Remove cluster lid C. Refer to IP-12, "Removal and Installation".
2. Remove cluster lid D lower finisher. Refer to IP-12, "Removal and
Instal ...
Removal and Installation
REMOVAL
1. Remove the Cluster D lower finisher. Refer to IP-12, "Removal and
Installation".
2. Put selector lever in the drive "D" position (CVT mo ...
Other materials: Tire Pressure Monitoring System
(TPMS)
Each tire, including the spare (if provided),
should be checked monthly when cold and
inflated to the inflation pressure recommended
by the vehicle manufacturer on
the vehicle placard or tire inflation pressure
label. (If your vehicle has tires of a different
size than the size indicated on the vehi ...
Variable voltage control system
CAUTION
Do not ground accessories directly to
the battery terminal. Doing so will
bypass the variable voltage control
system and the vehicle battery may
not charge completely.
Use electrical accessories with the
engine running to avoid discharging
the vehicle battery.
Your vehicle is equi ...
Interior lights
The interior light can be turned on regardless
of door position. The light will
go off after a period of time unless the
ignition switch is placed in the ON position
when any door is opened.
The interior lights can be set to operate
when the doors are opened. To turn off
the interior light ...

 Audio unit
 CD Changer