Nissan Altima (L32) 2007-2012 Service Manual: Condenser
Removal and Installation for Condenser
REMOVAL
1. Discharge the refrigerant. Refer to HA-32, "HFC-134a (R-134a) Service
Procedure".
2. Remove the front fascia (coupe only). Refer to EXT-17, "Removal and
Installation".
3. Remove the front grille (sedan only). Refer to EXT-38, "Removal and
Installation".
4. Remove the junction pipe. Refer to HA-40, "Removal and Installation for
Junction Pipe".
CAUTION:
Cap or wrap the joint of the pipe with suitable material such as vinyl tape to
avoid the entry of contaminants.
5. Disconnect the refrigerant pressure sensor connector.
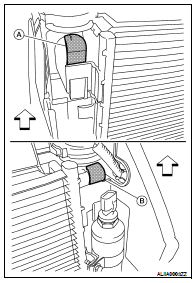
6. Depress the top RH clip (A) and the top LH clip (B) to release
the top condenser brackets as shown.
7. Slide the condenser up to release the condenser from the clips
as shown.
8. Remove the condenser.
CAUTION:
Do not damage the condenser fins
INSTALLATION
Installation is in the reverse order of removal.
Refer to HA-31, "Component".
CAUTION:
• Do not damage the condenser fins.
• Replace the O-rings of the junction pipe and refrigerant pressure sensor with
new ones, then apply
A/C oil to them after installing them.
• When charging refrigerant, check for leaks. Refer to HA-25, "Checking of
Refrigerant Leaks".
Removal and Installation for High-Pressure Pipe
QR25DE
Removal
1. Discharge the refrigerant. Refer to HA-24, "HFC-134a (R-134a) Service
Procedure".
2. Remove the strut tower bar. Re ...
Removal and Installation
REMOVAL
1. From under the vehicle, disconnect the ambient sensor connector
(2).
2. Release the ambient sensor clip and remove the ambient sensor
(1).
INSTALLATION
I ...
 High-pressure pipe
 Ambient sensor