Nissan Altima (L32) 2007-2012 Service Manual: Antenna AMP
Removal and Installation - Coupe
REMOVAL
1. Remove the rear pillar finisher RH. Refer to INT-20, "Exploded View".
2. Detach the antenna amp harness clip (B), disconnect the
antenna amp connectors (A), remove the antenna amp screw
(C) and remove the antenna amp (1).
NSTALLATION
Installation is in the reverse order of removal.
Removal and Installation - Sedan
REMOVAL
1. Remove the rear pillar finisher RH. Refer to INT-42, "Exploded View".
2. Partially remove the side curtain air bag module RH to gain access to the
antenna amp. Refer to SR-12,
"Removal and Installation".
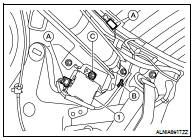
3. Detach the antenna amp harness clip (A), disconnect the
antenna amp connectors (B), remove the antenna amp screw
(C) and remove the antenna amp (1).
INSTALLATION
Installation is in the reverse order of removal.
Location of Antenna
1. In-line connectors M87, M501
2. Audio unit harness
3. Audio unit
4. Satellite antenna
5. Audio antenna feeder
6. Satellite radio antenna feeder
7. Window Antenna
8. An ...
Removal and Installation
REMOVAL
1. Remove the room/map lamp assembly. Refer to INL-121, "Removal and
Installation".
2. Detach the microphone connector (A).
3. Remove the map lamp ...
Other materials: Supplemental air bag warning labels
Warning labels about the supplemental
front-impact air bag system are placed in
the vehicle as shown in the illustration.
WARNING
Do not use a rear-facing child restraint
on a seat protected by an air bag in
front of it. If the air bag deploys, it may
cause serious injury or death.
Supplemental air ...
Booster seats
For additional information on installing a
booster seat in your vehicle, follow the instructions
outlined in this section.
Precautions on booster seats
WARNING
If a booster seat and seat belt are not
used properly, the risk of a child being
injured or killed in a sudden stop or collision
greatly inc ...
Warning/Indicator lights (other)
For additional information on warnings
and indicators, see "Vehicle information
display-5 inch (13 cm) Type A" or
"Vehicle information display 7 inch (18 cm)
Type B".
Automatic brake hold
indicator light (white/green)
(if so equipped)
The automatic brake hold indicator light
(white) illuminates whe ...
 Audio antenna (sedan)
 Microphone