Nissan Altima (L32) 2007-2012 Service Manual: On-vehicle repair
GENERATOR
Removal and Installation
QR25DE
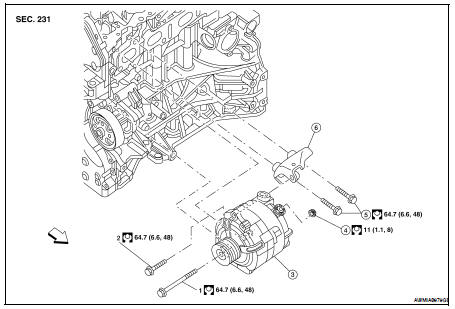
1.-2. Tightening order
3. Generator
4. B terminal nut
5. Generator bracket bolts
6. Generator bracket

Removal
1. Disconnect the battery negative terminal. Refer to PG-68, "Removal and Installation" (Coupe models) or PG-139, "Removal and Installation" (Sedan models).
2. Remove engine side undercover using power tools.
3. Remove drive belt. Refer to EM-16, "Removal and Installation".
4. Remove “B” terminal nut.
5. Remove air intake duct. Refer to EM-25, "Removal and Installation".
6. Disconnect generator harness connectors.
7. Remove generator ground harness bolt.
8. Remove generator bolts, using power tools.
9. Remove generator assembly upward.
Installation
Installation is in the reverse order of removal.
CAUTION: Be sure to tighten “B” terminal nut carefully.
• Install generator and check tension of belt. Refer to MA-14, "DRIVE BELTS : Checking Drive Belts".
• For this model, the power generation voltage variable control system that controls the power generation voltage of the generator has been adopted. Therefore, the power generation voltage variable control system
operation inspection should be performed after replacing the generator, and then make sure that the system operates normally. Refer to CHG-6, "System Description".
VQ35DE
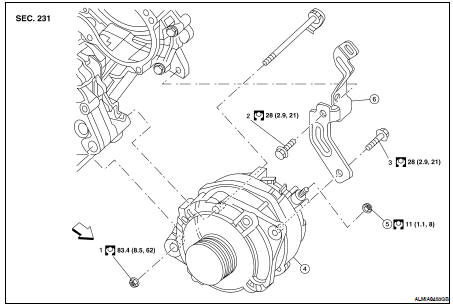
1.-3. Tightening order
4. Generator
5. B terminal nut
6. Generator bracket

REMOVAL
1. Disconnect the battery negative terminal. Refer to PG-68, "Removal and Installation" (Coupe models) or PG-139, "Removal and Installation" (Sedan models).
2. Partially drain engine coolant. Refer to CO-35, "Changing Engine Coolant".
3. Remove engine room cover.
4. Remove RH front wheel and tire assembly. Refer to WT-66, "Adjustment".
5. Remove engine side undercover using power tools.
6. Remove air cleaner and duct assembly. Refer to EM-129, "Removal and Installation".
7. Remove battery tray. Refer to PG-68, "Removal and Installation" (Coupe models) or PG-139, "Removal and Installation" (Sedan models).
8. Remove cooling fan assembly. Refer to CO-40, "Removal and Installation".
9. Evacuate A/C system. Refer to HA-32, "HFC-134a (R-134a) Service Procedure".
10. Remove drive belt. Refer to EM-121, "Removal and Installation".
11. Remove the A/C compressor. Refer to HA-36, "Removal and Installation for Compressor - VQ35DE Models".
12. Remove idler pulley.
13. Remove A/C idler pulley.
14. Disconnect oil pressure switch.
15. Disconnect the generator harness connectors.
16. Remove the generator bolt and nuts, using power tools.
17. Slide the generator out and remove.
INSTALLATION
Installation is in the reverse order of removal.
CAUTION: Be sure to tighten “B” terminal nut carefully.
• Install generator and check tension of belt. Refer to EM-121, "Checking Drive Belts".
• For this model, the power generation voltage variable control system that controls the power generation voltage of the generator has been adopted. Therefore, the power generation voltage variable control system operation inspection should be performed after replacing the generator, and then make sure that the system operates normally. Refer to CHG-6, "System Description".
Inspection
GENERATOR PULLEY INSPECTION
Perform the following.
• Make sure that generator pulley does not rattle.
• Make sure that generator pulley nut is tight.

 Preparation
 Service data and specifications (SDS)