Nissan Altima (L32) 2007-2012 Service Manual: Door finisher
Exploded View
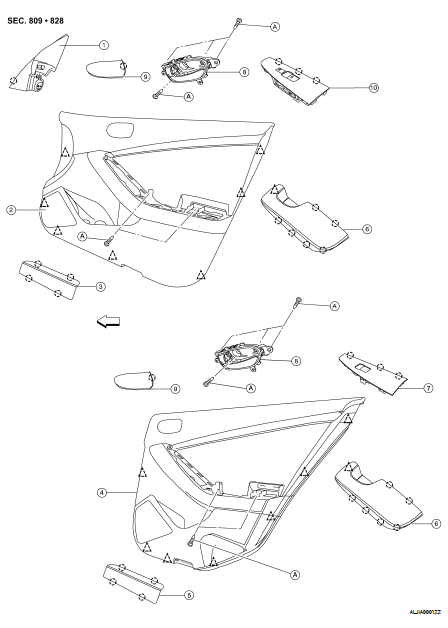
1. Mirror cover
2. Front door finisher
3. Step lamp lens
4. Rear door finisher
5. Step lamp/reflector lens (if equipped)
6. Arm rest finisher
7. Rear door power window switch finisher
8. Inside release handle
9. Inside release handle escutcheon
9. Inside release handle escutcheon
A. Screw


Removal and Installation
FRONT DOOR FINISHER
Removal
1. Release the pawls and remove step lamp lens, then disconnect the connector.
2. Release the pawls at the rear edge and remove inside release handle escutcheon, then remove the screw.
3. Release the clip at the front edge, then lift upward to release pawls and remove arm rest finisher.
4. Lift power window and door lock/unlock switch finisher upward to remove, then disconnect the connectors.
• Remove the front door finisher screws beneath power window and door lock/unlock switch finisher.
5. Release the clips around outer edge, then remove front door finisher.
6. Disconnect inside release handle and lock knob cables from back of front door finisher.
7. Release the pawls and remove mirror cover.
REAR DOOR FINISHER
Removal
1. Release the pawls and remove the step lamp/reflector lens, then disconnect the connector (if equipped).
2. Release the pawls at the rear edge and remove inside release handle escutcheon, then remove the screw.
3. Release the pawls and lift upward to remove arm rest finisher.
4. Lift power window switch finisher upward to remove, then disconnect the connector.
• Remove the rear door finisher screws beneath power window switch finisher.
5. Release the clips around outer edge, then remove rear door finisher.
6. Disconnect inside release handle and lock knob cables from the back of rear door finisher.
Installation
Installation is in the reverse order of removal.
 On-vehicle repair
 Body side trim